
vitepress 博客添加搜索效果
Vitepress 的搜索一般都是使用的 algolia
这里将申请流程走一遍。
配置 algolia 申请授权
我们先打开申请地址:algolia申请授权,打开后填写公开的一个网址,邮箱,仓库地址等信息,网址必须是可以公开访问的!

填写完成后,一般一两天就会在邮箱中收到一封邮件:
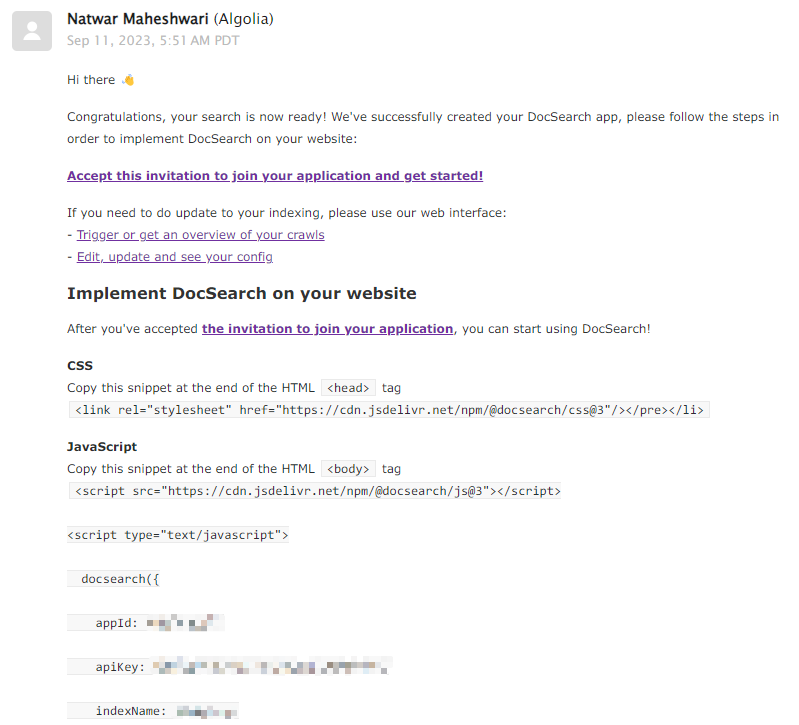
里面有我们配置的一些信息:appid、apikey、indexname 等等
Vitepress 中配置
找到 docs/.Vitepress/config 文件进行配置
javascript
import { defineConfig } from 'vitepress'

export default defineConfig({
  themeConfig: {
    // ...
    algolia: {
      appId: 'Algolia 应用程序的 ID,随便起',
      apiKey: '只有读能力的 Api Key',
      indexName: '你的 algolia 的 index 名'
    }
  }
})
配置脚本
在我们申请通过后,我们搜索是没有数据的,所以我们自己配置 github actions 来自动执行脚本生成数据。
在项目根目录中创建 crawlerConfig.json 文件
json
{
  "index_name": "dylanjs_blog_top_search", // 在algolia中创建的index_name
  "start_urls": ["http://mengyang.online/"], // 自己的网站
  "rateLimit": 8,
  "maxDepth": 10,
  "selectors": {
    "lvl0": {
      "selector": "",
      "defaultValue": "Documentation"
    },
    "lvl1": ".content h1",
    "lvl2": ".content h2",
    "lvl3": ".content h3",
    "lvl4": ".content h4",
    "lvl5": ".content h5",
    "content": ".content p, .content li",
    "lang": {
      "selector": "/html/@lang",
      "type": "xpath",
      "global": true
    }
  },
  "selectors_exclude": ["aside", ".page-footer", ".next-and-prev-link", ".table-of-contents"],
  "custom_settings": {
    "attributesForFaceting": ["lang", "tags"]
  },
  "js_render": true
}
然后在 github 上创建 ALGOLIA_API_KEY 和 ALGOLIA_APP_ID,key 是 admin 的 key
创建 github 工作流:
yml
name: 更新algolia爬虫数据
on:
  push:
    branches:
      - master
jobs:
  algolia:
    runs-on: ubuntu-latest
    steps:
      - name: Sleep for 200s
        uses: juliangruber/sleep-action@v2.0.0
        with:
          time: 200s
      - uses: actions/checkout@v3
      - name: Get the content of algolia.json as config
        id: algolia_config
        run: echo "config=$(cat crawlerConfig.json | jq -r tostring)" >> $GITHUB_OUTPUT
      - name: Push indices to Algolia
        uses: signcl/docsearch-scraper-action@master
        env:
          APPLICATION_ID: ${{ secrets.ALGOLIA_APP_ID }}
          API_KEY: ${{ secrets.ALGOLIA_API_KEY }}
          CONFIG: ${{ steps.algolia_config.outputs.config }}